December 21, 2018

Planar Magnetic Headphones, Part 3: Finishing Up

Over a year later, I've finally finished up the planar magnetic headphones.  They even sound decent.


Here's the rest of the build log:

The change that got them from sounding terrible to sounding tolerable was reducing the tension in the membrane as much as possible.  The first few test versions were intentionally tensioned, which turned out to be a bad idea, causing weird notches and resonances in the frequency response.  The new membrane is glued to a frame under no tension.  I also switched to an even thinner flex pcb material, Pyralux AC 091200EV, which has a 12 micron kapton layer, 9 micron copper layer, and no adhesive.

After the toner transfer.  Getting the toner transfer right without wrinkling the material was tricky:


After etching.  The driver came out to about 50 ohm resistance.


This time I glued the membrane to a fiberglass frame.  To get the PCB flat without tension, I stuck it down to a metal plate by wetting the plate.  I forgot to take a picture of these assemblies, but here's one of the original PCBWay flex pcbs glue to an identical frame:


For the final headphones I'm using a single sided magnet array - I first built a single driver, and did experimenting with both single and double arrays, and qualitatively could not hear any significant difference between the two.  And a single array is about half the effort of the double array.  Here's the test-driver, with a plastic back, and the first ultra-thin board I was able to successfully etch:


I machined two new aluminum backs, and stole the headband from a cheap pair of headphones.  Maybe eventually I'll get around to making a nice headband, but for the time being I'm not particularly interested in building headbands:


On a dummy head:


They sound decent.  They're a bit bass-heavy, and require some equalizing, but once that's done I quite like them.

December 1, 2018

CORE Outdoor Power PCB Motor Teardown

A company called Core makes some unusual electric lawn tools based on axial flux PCB motors.  I first heard about them several years ago, and finally picked up one of the motors to take apart.

Here's the weed-wacker.  I just got the head of the tool- they make a base called the "drive unit", which holds the battery and electronics.  Each head has its own motor:


The motor's right at the end, direct driving the spool of wire:


Removed from the stick.  Three board-mount faston terminals for phase power, and another connector for hall sensors.


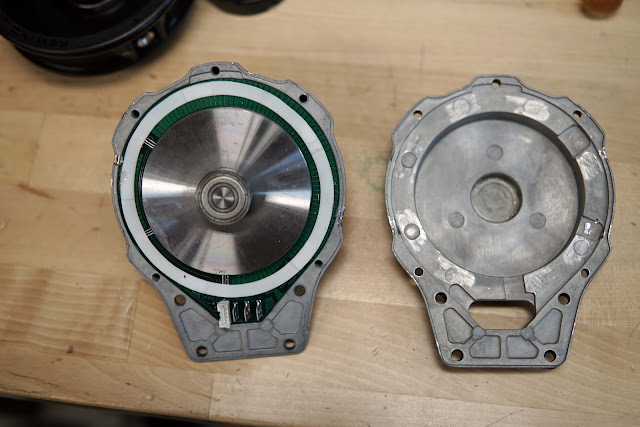
The motor was a huge pain to take apart, as it is pretty much entirely held together with retaining compound.  With a hammer and some screwdrivers I was able to pull off the back cover:


The shaft and front bearing were pushed out of the other half of the housing with a gear puller.  There's a ring of thermal pad on one side of the board:


It's a dual-rotor design, with the PCB stator sandwiched between the two halves of the rotor.  The rotor is held together by even more retaining compound:


To pull off half of the rotor, I gripped it in a small lathe chuck and used  a gear puller to pull it off the shaft:


First a closer look at the stator.  The board had at least 4 layers, and probably has 4 oz copper - it's very dense feeling. 

Some observations and thoughts:

- Each phase has 4 4-turn coils, and the 3 phases are overlapped.   This is a full-pitch winding.
- This winding pattern results in a large area of end-turn, so the actual "active" area of the stator is unfortunately small - less than half the area of the PCB actually produces torque.
- The traces neck down and become thinner within the active area.  Presumably this is to reduce eddy current losses from the magnets swinging over the traces. 
- The hall sensors are through-hole halls, surface mounted sideways into cutouts in the PCB, so they add almost no additional thickness.
- The empty space around the edges of the board are filled with radial strips of copper.  I'm not really sure why.  Maybe for thermal reasons?  The edge of the board is heatsinked to the aluminum housing through a ring of thermal pad.

Here's the patent for reference.


The two rotors have single-piece magnets magnetized with 4 pole-pairs:


One of the reasons it's all held together with retaining compound is that the bearing bores in the castings aren't even post-machined.  The bearing is just glued straight into the rough, tapered hole in the casting:


Back-EMF is pretty sinusoidal.  An FFT reveals a little bit of 5th harmonic.  Flux linkage is ~.0044, for a torque constant of .0264 N-m/A (peak phase amps).  Line-to-line resistance is 125 mOhms. This gives a motor constant of .086 N-m/sqrt(watt).


Over all it's not a particularly high performance motor for it's size or weight.  There's a lot of dead space, and a very heavy, high-inertia rotor. 

September 29, 2018

Controlling Phase Current Harmonics with FOC and AFC

I was playing with my thermal test motor, and noticed that at high speeds, some pretty significant harmonics showed up in the phase currents.  Here's an example with an obvious 5th harmonic - I'm commanding 20A, peak, and the harmonics add a couple amps of ripple on top of that:


This ripple shows up because there's a 5th harmonic in the motor's flux linkage (and therefore back-emf).  From the perspective of the field-oriented control, these harmonics at the phases show up as AC disturbances on the D/Q voltages.  The two current loops will try to squash these disturbances, but it's ability to do so depends on the current loop bandwidth and the magnitude of the disturbances.  Since both the magnitude and frequency go up with motor speed, even  really high-bandwidth current loops have trouble keeping up.  For example, in the scope shot at the top, the current loop had around 2 kHz closed-loop bandwidth.  The motor's electrical frequency was 300 Hz, so the harmonic (in D/Q) was at 1.8 kHz, so the controller couldn't quite reject it.

So how exactly do harmonics in the flux linkage at each phase show up when transformed into D and Q?  In the sinusoidal flux linkage case with no position-varying inductance, the motor's dynamics in the D/Q frame is exactly the classic voltage equations:

$$V_{d} = Ri_{d} + L\frac{di_{d}}{dt}  - \omega Li_{q}$$
$$V_{q} = Ri_{q} + L\frac{di_{q}}{dt}  + \omega Li_{d} + \omega\lambda$$

Where \(L\) is the synchronous inductance, \(R\) is the synchronous resistance, \(\omega\) is the (electrical) angular velocity, and \(\lambda\) is the peak flux linkage of one phase.

In the equations above, the flux linkage of a single phase \(\lambda_{p}\) is assumed to be of the form \(\lambda_{p} = \lambda \cos(\theta)\), where \(\theta\) is the rotor angle.  Other phases will have an offset of \(\pm \frac{2\pi}{3}\).

If the flux linkage has a fifth-harmonic in it, for a single phase it looks like \(\lambda \cos(\theta) + \lambda_{2}\cos(5 \theta) \).  With the fifth harmonic in flux linkage, the voltage equations in D and Q become:

$$V_{d} = Ri_{d} + L\frac{di_{d}}{dt}  - \omega Li_{q} + 5\omega\lambda_{2}\sin(6\theta)$$
$$V_{q} = Ri_{q} + L\frac{di_{q}}{dt}  + \omega Li_{d} + \omega\lambda - 5\omega\lambda_{2}\cos(6\theta)$$

(I have no interest in doing tedious trig and algebra by hand, so I wrote a Mathematica script to do the transforms analytically for me.)

That's interesting  - a fifth harmonic at the phases shows up as a 6th harmonic through the transforms.  It turns out, a 7th harmonic at the phases also shows up as a 6th harmonic through the transforms - just with both positive sine and cosine components, rather than positive sine negative cosine.  11 and 13 show up as 12, and so on.  Also (although this may be more intuitively obvious), odd multiples of 3 disappear through the transforms.

Just to confirm, here's the output when plugging a fifth harmonic into my motor simulator, using the the other motor parameters from the U12 and same controller gains as the hardware.

Phase currents:


D and Q axis currents, as well as rotor angle.  You can count the 6 periods in the AC component of the current per electrical cycle.


So what if you want to control out those harmonics?  Or add in harmonics of your own, for some reason?  If you know how the voltages of the harmonics appear on the D and Q axes, theoretically you could feed-forward them out, but there's a more interesting way to closed-loop deal with them, without knowing the specific amplitude of phasing of the harmonic, just it's frequency.

Introducing Adaptive Feedforward Cancellation.  This is a weird technique which was briefly introduced at the very end of 2.14, which has the seemingly magical property of giving your controller infinite gain at a specific frequency - i.e. it will perfectly track a signal at that frequency, or perfectly reject a disturbance at that frequency.  AFC is probably most well-known for its use in things like hard-disk read heads, which have to follow very fine tracks of data on the hard drive platters.  Since the platters have some runout as they spin, the read-head has to track in the presence of periodic disturbances.  Interestingly, AFC is a lot like field oriented control: FOC gives your controller infinite gain at the fundamental electrical frequency of your motor, letting you track sinusoidal currents of much higher frequency than the bandwidth of your current controllers.

Here's a block diagram of how AFC works, taken from the paper "Adaptive feedforward cancellation viewed from an oscillator amplitude control perspective".  \(r(t)\) is the reference (current, in my case), and \(d(t)\) is a disturbance (back-emf harmonics, in my case), and \(y(t)\) is the control effort (D or Q voltage in my case).


And here's how the AFC(s) are integrated into the control loop.  The red box is your normal feedback controller (in my case the PI current controllers for D and Q current).


The AFC works kind of like a pair of integrators on the sine and cosine components of the periodic part of the error.  If there's zero error \(e(t)\), the AFC outputs the sum of \(\cos(\omega t)\cdot (\text{cos integral})\) and \(\sin(\omega t)\cdot (\text{sin integral})\), which is some sinusoidal thing.  If there is some error, the portion of it at the same frequency as \(\omega\) doesn't average to zero when multiplied by the \(\cos(\omega t)\) or \(\sin(\omega t)\)'s before the integrators.  The integrators then integrate up to whatever value drives the  \(\omega\) frequency component of the error to zero.

The slight modification to get this to work for motor currents is changing the \(\omega t\) to be \(\theta\), the electrical angle of the motor.  The periodic disturbances are not a fixed frequency in time, they are a fixed frequency in state. 

This basically just works.  Implementing a 6th harmonic AFC on both the D and Q current loops completely eliminates the 5th harmonic in phase currents.  Here's the simulation result:

Phase currents:


D/Q currents:


And here's what the integrators in the AFC do:


There's one simple addition to the controller which makes it behave a little better.  The magnitude of the harmonic voltage is proportional to how fast the motor is spinning - so if the motor is accelerating, the magnitude is increasing, and the AFC integrators are constantly playing catch-up.  This means that at a constant acceleration, there will be a constant error in the AFC:


The AFC still does a pretty good job even at high acceleration, but how well it does depends on how large the AFC gain is.  Below you can see the integrators ramping up with speed:


The simple fix for this is to divide the error by angular velocity before integrating, and then multiply by angular velocity at the end of the AFC calculations.  This way, the AFC integrators integrate up to the harmonic in the flux linkage, which is constant, rather than the back-emf, which is proportional to speed.  Honestly, this change doesn't make a huge difference, because the time constant of the integrator can be quite fast compared to how fast the motor can accelerate, but it's kind of cool none the less:


Now the integrators just converge to constants, even as the motor accelerates:


Pseudo-code implementation:


 1
 2
 3
 4
 5
 6
 7
 8
 9
10
11
12
13
14
15
h = 6.0f;  // Harmonic number
k_afc = 100;  // AFC Gain - larger gain converges faster

s = sin(h*theta);
c = cos(h*theta);

i_error = i_ref - i;
if(abs(thetadot) > 1) //avoid dividing by zero
{
 afc_cos_int += dt*i_error*k_afc*c/thetadot; 
 afc_sin_int += dt*i_error*k_afc*s/thetadot;
}
afc_out = thetadot*(s*afc_sin_int + c*afc_cos_int);

i_error = i_ref - i + afc_out;  //Now use this error in the PI current loop.


And here it is after implementing on the hardware:


The AFC behaves a little strangely when the voltage saturates (causing higher harmonics to show up), and I haven't put any effort into fixing that, but for most operating points it works quite well.

Here's an FFT of the phase current at the beginning of the post.  There are significant components at 5, 7 and 11 times the electrical frequency:


And here's the FFT after adding an AFC at 6 times the electrical frequency:


In addition to canceling out harmonics, you can use this technique to add in harmonics of your own, or track periodic current references.

For example, a typical way to cancel out cogging torque is to add in an AC component to your Q-axis current reference which tries to cancel out the cogging torque.  The controller's ability to track this reference depends on how fast the motor is spinning, and its bandwidth.  But if you add in an AFC at the cogging frequencies, the AFC just takes care of tracking the cogging current.

Or if you want to add certain harmonics at the phases, you can do so by taking the dq0 transform of the harmonics you want, then adding those to your D/Q current references with an AFC to track them.  Say, for example, you wanted your phase currents to be more trapezoidal, you could take the transform of the trapezoidal waveform, use that as your D/Q current references, and add AFCs at the first few Fourier coefficients in order to track the reference at high speed.

August 21, 2018

Thermal Testing, Round 2

I made a cover for the small motor controller, which serves as both a top-side heatsink for the MOSFETS and gate driver, and (more importantly) as a clamping mechanism to keep the PCB flat and evenly pressed against the heatspreader beneath it.

In the picture below, the heatspreader is on the left, and cover on the right:  The bar across the bottom sits on top of the FETS, the square in the middle sits above the DRV chip.  I left a 0.1mm gap between the FET-bar and the top of the FET package, which gets filled by some .5mm thermal pad.  This allows for some variation in the height of the transistors once they're soldered down, and the compression of the thermal pad means there's a fair amount of pressure pushing down on the top of each transistor.


Motor Controller Sandwich:


The two little holes let through light from the two indicator LEDs on the board.


I made a Special Motor Controller Cover of Science to help out with thermal camera-ing.  It has a 1.5mm hole drilled above the center of each transistor, so that I can see through the cover with the camera.  I stuck it on the same controller and motor I used for the last round of testing.  I was able to use a needle to cut away the circle of thermal pad at the bottom of each hole, so you can see straight through to the tops of the FET packages.


Here's an example image You can see the transistors clearly through the holes.  The bright spot on the cover where point Sp2 is is where I applied some matte black paint to get the emissivity of the aluminum cover closer to 1.


The cover was extremely effective.  Here's a 30A test.  By the time the motor windings reached 70 C, the FETs were all under 48 C, and there was only a 1.6 C difference between the hottest and coldest transistors.  For reference, in my last tests without the cover, by the time the motor reached 70 C at 30 amps, the FETs were between 67 and 72 C.


Going a little harder, here's after running 33 A until the motor windings reached a rather uncomfortable 80 C.  There's a 5 degree drop between the top of the transistor and the surface of the cover.


That's all for now.  

July 4, 2018

Thermal Testing

With the various layout errors on the last set of boards fixed, the controller seems to work as expected, so I've been doing some thermal testing.

I strapped the controller to a much bigger motor:  Even with the old version of the controller, the small motors I've been using would catch on fire before the controller does. 

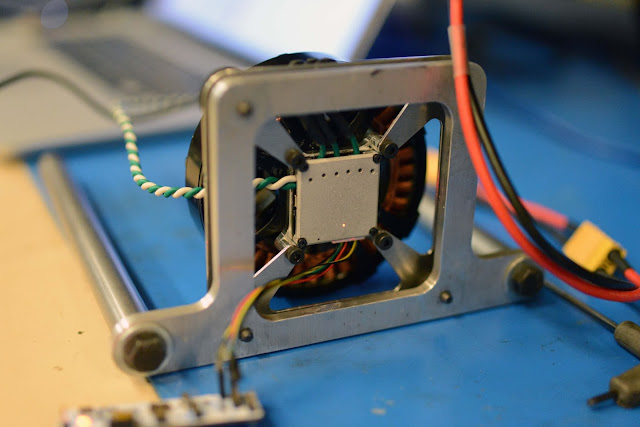
Here it is attached to a T-motor U12:


The test setup, with the motor and controller in view of Bayley's thermal camera


For the first tests, I put the test current on the d-axis, and 2A on the q-axis just to get the motor spinning. 

Originally, I had a 0.5mm layer of thermal pad between the board and an aluminum heatspreader and aluminum motor mount beneath.

At 15 amps, basically nothing happened.  I made the passives for the buck converter and the 3.3V linear regulator much smaller on this board, so it was good to see that they're doing fine.


At 20 A you could start to see the FETS getting warm. 


And here's 30A.  I only let this one run for around 30 seconds.  The FETs in the middle of the board are noticeably hotter than those by the edges, which I partially blame on poor contact with the thermal pad.  Since the screws are at the edges of the board, the board flexes when they are tightened, and all the clamping pressure is at the corners.  Also interesting, it looks like the trace from the source of the FET in the bottom right corner is getting pretty warm.  The hole for the mounting screw makes the phase polygon pretty narrow there.  I should be able to fix that by adding a row of vias from the source legs to the internal phase layer (which I should have added before).  These boards only have 1 oz copper on top and bottom, and 1.5 oz internal layers.  


And the plots.  With this setup, I wouldn't be comfortable running the controller at 30A continuous.


I switched out the thermal pad for a layer of kapton tape for electrical insulation, and some thermal paste.  Contact in the middle was still not great, but overall it was a lot better than the thermal pad.


Performance was greatly improved, but there's still a ~7 degree C difference between the hottest and coldest FETs.  Furthermore, in the middle of the board, the low-side FETs are several degrees hotter than the high-side FETs - traces  Sp3 and Sp2 respectively on the plot below:


It looks like with this setup, the controller can handle around 30A continuously.  I'm pretty satisfied with that, but I think the performance would be substantially improved by adding an aluminum cover over the motor controller which firmly pressed against the row of FETS, to get good contact on the bottom of the board.  The cover would also serve as a top-side heatsink, which is surprisingly effective with this FET package, as there's only ~0.3mm of plastic above the copper clip on top of the die (I sanded one down to measure).

I've been using these 3.3 mOhm fets, which I like because they're cheap and have only 50 nC gate charge, so they don't stress the DRV chip switching at 40 kHz.  I swapped out the FETs for the 1.4 mOhm flavor, since I had a bunch of them lying around.  These have ~half the resistance, but about twice the gate charge, so twice the switching loss.  It works out slighly favorably in this case (for currents above around 20A) - I expect around 10% less dissipation per-fet at 30A.

Here's 30A on the 1.4 mOhm FETs.  Check out how much hotter the DRV chip gets, doing twice the gate drive work.  ~10 C hotter than before.  There are actually lots of better transistors available now, even for similar price, so I can get power dissipation down around 15-20% further.


To make the tests a bit more stressful, I put the motor on the dyno so I could actually get some power into and out of it.  I made a new motor mounting plate which doesn't cover up the controller:


This time, I put all 30A on the Q-axis, and ramped up the speed until the achievable current just started to drop off (which is the maximum power point for this motor).  At 22V on the bus, I was able to put 500 watts in and get 400 back out.  I let everything cook for a while to get up to temperature.  The only noticeable difference was that the DC link wires were roasting.  The 16 AWG is not really meant for 23A DC + ripple current in continuous duty.  Going into this test, I was a little worried about how the ceramic DC link capacitors would handle the current ripple, since there's only 60 uF on the board, but they didn't get any hotter.


To see where all the temperature drop was coming from, I got a side-view of the heatspreader and motor mount assembly.  Point Sp3 is on the side of the motor mount, point Sp2 is on the side of the heatspreader, Sp1 is the hot FET, and Sp4 and 5 are the cooler FETs.  This is after running for several minutes continuously at 30 A


The heatspreader, motor mount, and the back of the motor were all within a couple degrees of each other, with all the temperature drop happening between the FETs and the heatspreader.


With an estimated power dissipation of 1 watt per FET at 30A, this gives a thermal resistance of 12 C/watt between the transistor and the heatspreader for the cooler FET, and 17 for the hot one.  

Here's a sketched cross section of the 3 different FET layouts on the board, and why I think the low-side FETs with shunts get so much warmer than the others (in addition to the poor clamping at the middle of the board).

First, the high-side FETs, which are the coolest.  Labeled stack-up on the left, main heat conduction path on the right.  The vias beneath the drain tab go straight into the big V+ plane on the bottom, which is copper, so super thermally conductive in the plane.  This effectively increases the area which conducts through to the heatspreader.


The low-side FET without the shunt, which was much cooler than the other two, looks like this:  It has a bunch of vias from the source pins straight into the ground plane, in addition to the vias beneath the drain tab.  The source pins are part of a monolithic copper sheet ("clip") which sandwiches the top of the die, so they can very effectively sink heat away from the die.

And finally the low-side FETs with shunts, which get kind of screwed, with no big plane beneath them, and a shunt attached to the source pins:


One way to help out those FETs might be to add some extra heat-sinking planes on the bottom of the board, like this:


But more importantly than trying to tweak the board layout to slightly improve the thermal performance, where is all the thermal resistance coming from in the first place?

According to the FET datasheet, the package to base thermal resistance is around 1.2 C/W.  

I got in touch with PCBWay, and their via plating thickness is 18-22 microns, independent of the copper plating thickness. According to the Via calculator, the resistance of the patch of drain vias should be 4.6 C/W.

There's also a layer of 1 mil Kapton tape, electrically insulating the heatspreader.   But the total thickness of the tape, including the adhesive, is 3 mil, or 75 microns.  The 5x5m mpatch under each FET has the thermal resistance of around 6.5 C/W.  

Ignoring the thermal paste, that's up to 12.3 C/W, which is right in line with the results from the thermal camera.

So the Kapton is the biggest culprit here.  I'd like to try using a hard-anodized aluminum heatspreader with no additional electrical insulation. The hard anodized coating is only 0.5-1 W/m*k, but it can be very thin. 

The next biggest resistance source is the vias.  The PCBWay via plating thickness corresponds to a little over 1/2 oz, but I could probably do better with some other PCB manufacturer.

Also worth noting, all these tests were with no airflow over the controller.  Pointing a good blower at the back dropped the temperatures by around 20C.

Next hardware steps:  wait for AMS position sensors and DRV8323RS chips to come back in stock, design a FET-clamping cover, and experiment a bit more with heatsinking.