I'll jump straight into the design, and then go back and justify it.
Here's a motor:

Here's what the stator looks like. This winding pattern is fairly incomprehensible from this picture, so I'll explain it more clearly later:

The stator consists of two thin fiberglass disks wound with litz wire, sandwiched on either side of another fiberglass disk, which is bolted to an aluminum hub.
Here's half of the rotor. The magnet arrangement is a 12 pole-pair, 90 degree halbach array arrangement assembled out of identical .25"x.25"x1" N50 magnets.
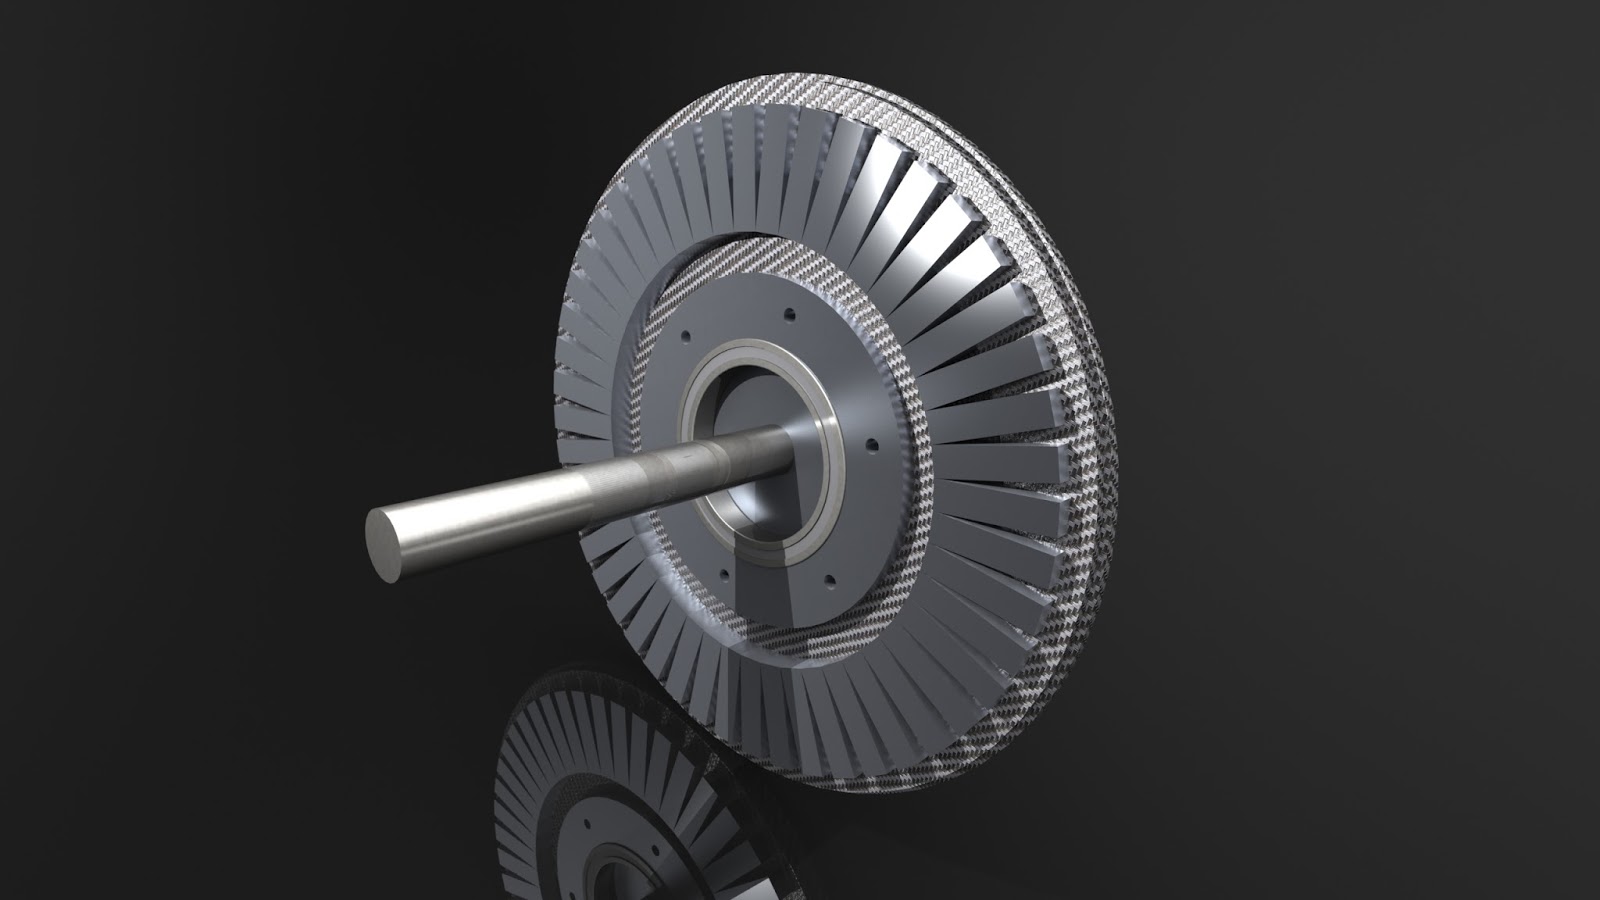
And the whole rotor (minus the cylindrical shell between the halves). Because of halbach array magic, the rotor can be made out of something awesome like carbon fiber, instead of steel. Honestly, there's little to no weight savings here using carbon fiber over aluminum, but A) carbon fiber is awesome, and B) techx funding is a great excuse to buy fancy materials.

To explain how this thing actually motors, I'll start out by explaining the windings. I spent a lot of time thinking about how to wind such a motor. Not being constrained to wind around a laminated steel stator means there are lots of options.
My first thought was to waterjet three identical winding out of sheets of copper, and epoxy them together 120 electrical degrees out of phase. Copper sheet windings would allow for variable wire width, so the conductors could get wider as the radius increased. Also, the end turns would not be constrained to the width of the rest of the winding, so they could be made much fatter. I knew eddy current loss in the windings would probably be a problem with this design, so I spent lots of time running through different winding geometries in MATLAB to figure out just how bad the losses would be. Then I gave up with that idea.
Turns out there's a really cool masters thesis on basically this exact thing. It's great at very low speed, since the copper fill factor is extremely high, but at any reasonable speed it gets destroyed by eddy current loss in the solid copper conductors. Also, it's probably the most beautiful set of windings I've ever seen.
Next option is to go the to the other end of the spectrum, and use litz wire to wind the stator. Extremely fine insulated strands should nearly entirely eliminate eddy current loss in the conductors. There are a bunch of possible strategies for winding the stator. Concentrated windings, like Shane's LEAF motor makes winding much easier, but there's a lot of unused space in the stator where copper could go. To think about winding configurations, I mentally stretched the motor out into a line. My first thought for a distributed winding pattern looked something like this:
With one phase, it's really easy to see how how the lorentz-force action works:

To make it three phase, just copy and paste that same winding pattern twice, shifting by 120 electrical degrees each time:

Wrapped around into axial-flux, a phase looks like this:

Unsurprisingly, this has been done. Here's a great example of a stator which appears to be made this way. There are a few things I don't like about his winding pattern though. First, there is quite a bit of copper in the end turns (although the end turn to active copper ratio goes down as you add more poles). Also, the end turns have to overlap each other with three phases, meaning the inner and outer rings of the stator need to be thicker than the active region.
Here's another idea. Turns go diagonally across each pole, instead of up and over:

That's interesting. It's pretty intuitive that this winding pattern will have a lower torque constant than the rectangular winding, since each turn overlaps the whole sinusoidal field. To the first order, I'd expect the peak torque produced by a phase to be lower by a factor of roughly 2/π ((integral from 0 to pi of sin(x)) / (integral from 0 to pi of 1)) However, it also clearly will have lower resistance than the rectangular winding. Also, there's no end-turn overlap, so stator can be made a constant thickness throughout.
Just by looking at it, it's not exactly clear whether the lost resistance makes up for the lower torque constant, but it does seem easier to build, so I designed a motor around it and then figured out how it should perform. Fun fact, it turns out this is pretty much how Faulhaber motors are wound, but those are radial, not axial. I haven't seen any axial flux motors wound this way.
On to actually analyzing this thing. First I took a look at the magnet array in FEMM. I unrolled the motor to a line at its average radius, since FEMM is 2D. I didn't bother with looking at the entire magnet array, and just simulated a few pole pairs:

The normal flux density around the middle of the airgap looks like this. Peak normal flux density of around .75 T. Not too bad for a 10mm gap between magnet surfaces. Looks pretty sinusoidal, too (ignore the edges).

Now I know what the field looks like. Rather than doing the rest of the simulation in FEMM, which is certainly possible, I did it in MATLAB because I have little interest in learning how to do FEMM Lua scripting.
My stator is wound for 12 pole pairs, and 5 turns per phase. However, the turns are evenly distributed about the circumference of the stator, not concentrated on top of one another. Stretched out into a line (again), the winding pattern looks like this:

All the turns in a phase are in series with one another.
To figure out things like back EMF and torque constant I took another LEAF (ha!) out of Shane's book.
Method 1: Lorentz Force
The most intuitive way to look at the torque constant is probably doing ILxB on all the wires to find the force on them for a given current, and adding up the wires that correspond to each phase. This method resulted in a torque constant of .0752 N-m/A for one phase.
Method 2: Looking at Flux Linkage
This was was definitely less intuitive, but produces some more information. Here's how it works:
- Define the shape of one turn of one phase, and define a sinusoidal flux density for a couple pole pairs.
- Integrate the flux density over the area of the turn, for flux linked by one turn of one coil.
- Virtually shift the coil a little bit along the magnets, and repeat the above calculations. Repeat until the coil has shifted by 2π.
- Repeat for each of the 15 coils (5 turns per phase, 3 phases), which are all offset from one another. This gives the linked flux vs electrical angle of each coil, which looks like this:

- Take the derivative and multiply by an arbitrary electrical frequency. I used 1256 rad/s, which corresponds to 1000 mechanical rpm with a 12 pole pair motor. This produces the voltage induced on each winding vs electrical angle.
- Add up the voltages of the coils which are part of the same phase:

- Back EMF constant (Ke) and torque constant (Kt) are equivalent, for a phase Kt of .077 N-m/A. Hey look, that's basically the same as before!
To see what would happen when wye-terminating the motor, you can subtract two phases from each other, since they are connected in series but joined at the ends:

Wye terminated, I should expect something like .13 N-m/A, or 72.5 RPM/volt. Seems pretty reasonable.
It's easy to compare skewed vs straight windings this way, also. For my particular motor geometry, using straight windings gives a 30% boost in torque constant, and a corresponding 30% increase in phase resistance. So overall, it actually produces a slightly higher performance motor, since motor constant (here defined as Kt/√resistance) is higher.
Actually building this thing:
Most of the motor parts were made on the MITERS CNC mill. Here's the fancy-looking end cap that joins the rotor to the shaft:

Plates that connect the thin section can bearing to the rotor:

The stator parts were routed out of 1/32" Garolite using a 1/16" carbide endmill borrowed from Nick. I messed up these parts a few time (trying to fit too many turns on the stator, messing up winding, etc) so I've gotten really fast at making these. I experimented with a couple methods for fastening the fiberglass to the mill. I bolted a sheet of masonite to my milling fixture, and adhered the fiberglass using spray adhesive, hot glue, and double sided tape. In the end, I like the double sided tape the best.


Two phases:

And all three:

I squished the windings in the mill vice to get them nice and flat:

The two stator windings were epoxied together with high temperature epoxy, clamped between two aluminum forms, and baked to cure:

Rotor parts were routed out of .1" carbon fiber sheet using the same 1/8" endmill. The sheet I used was laminated from unidirectional layers, and the top and bottom edges came out a bit fuzzy:

Filing with a diamond abrasive file cleaned up the edges:


Beginning the magnet array:


All the north-south pairs glued down:

Magnets really don't appreciate being forced into a halbach array, so I stuck a big steel plate on top of the array (with a thin plastic buffer between), and slid the sideways-pointing magnets in from the side, positioning them with a 3d-printed jig:

Everything was then slathered with epoxy and cured:

The steel disk was sheared off by tapping it with a hammer.

The aluminum hub holding the stator was the only component that was manual machining-intensive:

I paralleled the two halves of the stator, wye terminated them, and attached one of the two rotor disks for testing:


It's easy to compare skewed vs straight windings this way, also. For my particular motor geometry, using straight windings gives a 30% boost in torque constant, and a corresponding 30% increase in phase resistance. So overall, it actually produces a slightly higher performance motor, since motor constant (here defined as Kt/√resistance) is higher.
Actually building this thing:
Most of the motor parts were made on the MITERS CNC mill. Here's the fancy-looking end cap that joins the rotor to the shaft:
Plates that connect the thin section can bearing to the rotor:
The stator parts were routed out of 1/32" Garolite using a 1/16" carbide endmill borrowed from Nick. I messed up these parts a few time (trying to fit too many turns on the stator, messing up winding, etc) so I've gotten really fast at making these. I experimented with a couple methods for fastening the fiberglass to the mill. I bolted a sheet of masonite to my milling fixture, and adhered the fiberglass using spray adhesive, hot glue, and double sided tape. In the end, I like the double sided tape the best.
Getting the winding down took a few tries. The motor was wound with 20x5x38AWG litz wire. Since litz wire is twisted, when folding the wire around the opposite side of the fiberglass winding form, the wire behaves strangely. Winding one direction, it bends parallel to the sheet, and the other direction it bends perpendicular to the sheet. I chose the wrong direction to wind my first one, and it turned out terribly messy as a result. Next time around I realized winding the other direction would be much easier, and switched.
Here's one phase:
Two phases:
And all three:
I squished the windings in the mill vice to get them nice and flat:
The two stator windings were epoxied together with high temperature epoxy, clamped between two aluminum forms, and baked to cure:
Rotor parts were routed out of .1" carbon fiber sheet using the same 1/8" endmill. The sheet I used was laminated from unidirectional layers, and the top and bottom edges came out a bit fuzzy:
Filing with a diamond abrasive file cleaned up the edges:
Beginning the magnet array:
All the north-south pairs glued down:
Everything was then slathered with epoxy and cured:
The steel disk was sheared off by tapping it with a hammer.
The aluminum hub holding the stator was the only component that was manual machining-intensive:
I paralleled the two halves of the stator, wye terminated them, and attached one of the two rotor disks for testing:
A couple things are apparent. First, it definitely wants sinusoidal commutation. Nice and noisy with the hobbyking controller.
Also, the motor displayed astoundingly high loss at high speed. Just spinning the rotor by hand, it was easy to see how quickly the rotation was damped. Sounds like eddy current loss. By chucking the rotor in a drill and spinning it, I could even feel the windings warming. But wasn't the point of using fancy litz wire to eliminate that? At first I thought the process of oven-curing the epoxy had destroyed the litz part of the litz wire. I had set the oven to 120 C, so maybe there was a chance the temperature control loop overshot to 150 C, which would be dangerously hot for the insulation.
I made another stator. Before epoxying everything, I quickly tested it. And it displayed the exact same drag as the epoxied-and-baked stator. So something else was up. On a hunch, I unparalleled the two halves of the stator from each other. And the issue disappeared. Scoping corresponding phases on the two stator windings confirmed my suspicion. With only one half of the rotor in place, the two halves of the stator experience very different fields from the magnets on the rotor. Since they were wired in parallel, this caused massive circulating currents between the two halves of the stator, causing the drag that felt like eddy current drag.
Looking at the two curves on the scope screen, the yellow trace is the phase close to the rotor, while the blue one is the phase farther away. The farther away phase has less than half the voltage induced across it.
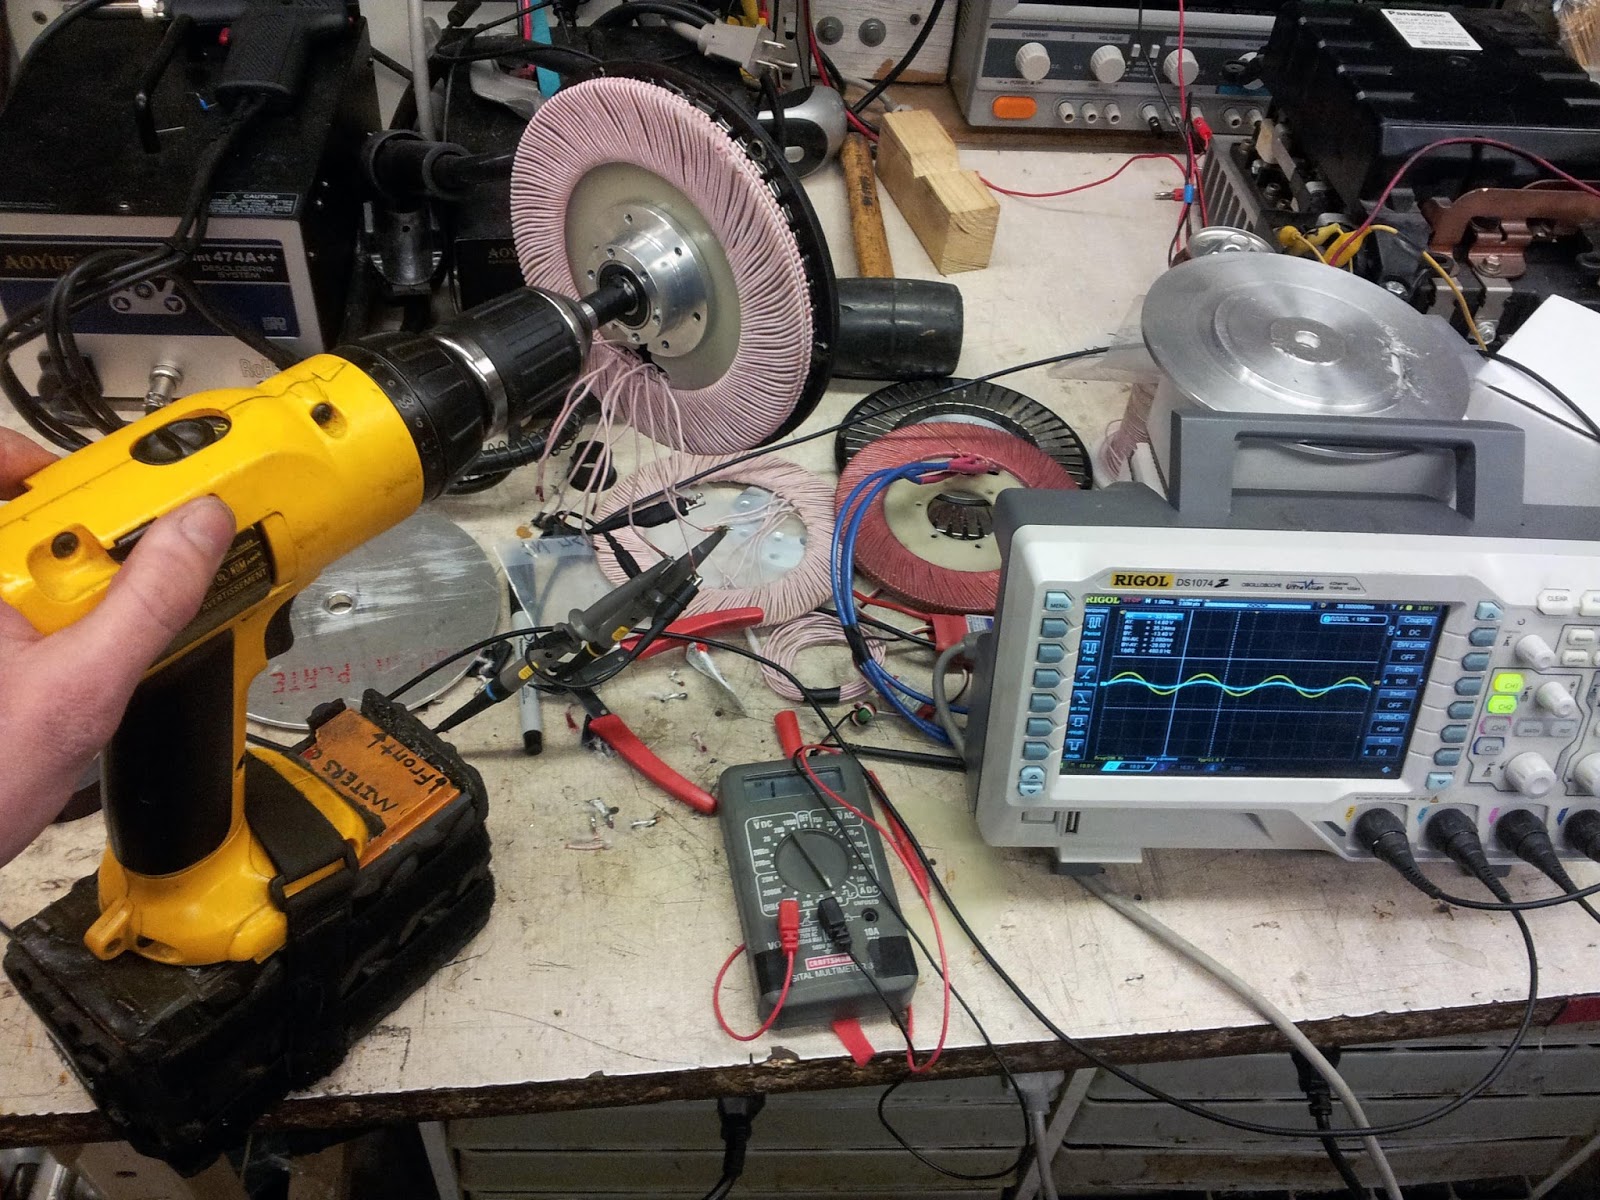
I un-terminated the first stator, and confirmed that it was also fine. Since the problem is due to the asymmetry of the rotor with only half of it installed, the obvious solution is just finishing the motor by adding the other half of the rotor. The two sets of windings should then be happy and symmetric. If the loss is still a problem, the solution is to series the two windings instead of paralleling them. This will make the motor even slower, but should completely fix that loss.
Now I just need to make a ring to separate the two halves of the rotor, so the thin-section bearings don't explode due to the magnetic attraction between the two plates. And find something silly to stick the motor on. And build another one, since I've already gone to the trouble of building a second stator.