June 23, 2013

REX 2013 Project: Rotating Climbing Wall

Every year during the freshman orientation, residents of my dorm (East Campus) build a variety of large wooden structures in the courtyard between the parallels.  Or rather, they design the structures, and then enlist the labor of excited freshmen to actually do most of the construction.

This summer, as not-a-frosh, a couple hall mates and I are joining in on the design side of things.  Our plan is to build a giant rotating cylindrical climbing wall.  Basically like this.  The cylinder you climb on will be 12' in diameter,  8' long, with the axle about which it rotates suspended 8.5' off the ground.

I started out by working on the design of the rotor.  I began by making these hexagons out of 4 x 4's.  Then I checked the mass properties in Solidworks, saw that it already weighed over 800 lbs, and started over with 2 x 4's.  


Here's the completed rotor design.  The hexagon is extended to a dodecagon around the outer edge.  The  board that make up the edges will be cut so that the actually make a circle, rather than a polygon.  The outside of the rotor made of sheets of 1/2" plywood.  The curve radius is large enough that I don't think it will be too difficult to bend the wood.

How 'bout that moment of inertia?

Here are some renders with a base added in:


The axle is a big steel tube, and it passes through a giant bearing on each side of the base.  The bearings, combined with the huge moment-arm on which a climber's weight acts means that climbers should have no trouble turning the rotor.  In fact, it may be too easy.  To limit the rotation speed, the rotor will have a brake attached to it.  So that the spokes and axle don't have to transmit any torque, the brake will act on the outside of the rotor.  A car wheel on another axle will press against the outside of the rotor on one side.  This wheel will have an adjustable brake attached to it.  I do not yet have a car wheel, but I do have a brake disk and caliper.  I think this 1' diameter truck disk will be sufficient.  The caliper, which came from the shop of a now-defunct electric car team, should also be adequate.


For lack of something better to do with the 3D printer I won, I printed a miniature model of the structure:


We've contacted some climbing gyms and climbing hold manufacturers to see if we can get the climbing holds sponsored for free.

Construction will begin toward the middle August.

June 17, 2013

Gourd Ukulele, Part 2

To attach the soundboard to the body of the ukulele, I first added some wooden braces, to add a bit of surface area to glue to:


Skipping a few steps...
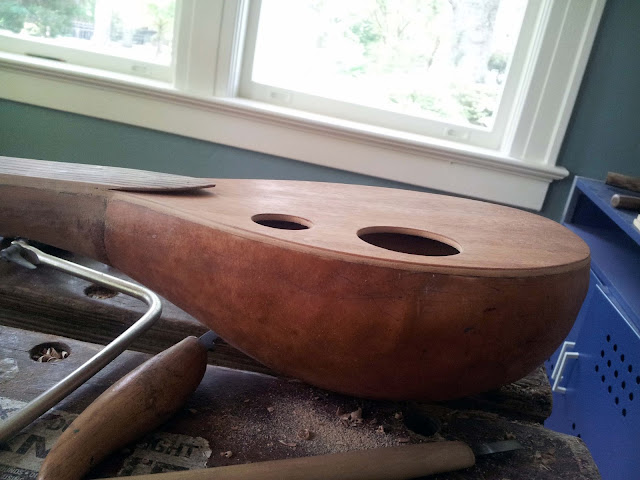
I made the soundboard from the bottom of an old drawer.  Unfortunately, the wood turned out to be veneered rather than solid, which according to the internet is inferior.  It sounds okay to me though.  I did not have any particular method for choosing the hole size and location.  I just tried to make them look nice.  I cut the holes by drilling a pilot hole through the wood, and then sawing them out with a coping saw.

I shaped the oak fretboard and glued it to the neck.  It becomes much thinner where the neck meets the body, so that the part of the fretboard that overlaps the soundboard does not actually touch the soundboard.


I wanted to get the ukulele to a playable state before I returned to campus, so I bought some violin tuning pegs rather than making my own.  I reamed the tapered holes using a combination of drill bits and a pair of scissors with appropriately tapered blades.


I used an online fret spacing calculator to figure out where the frets should go.  I carefully marked out their locations, and then cut slots for the frets with the coping saw.


I wasn't confident that the barbs on the fret wire alone would hold the frets in, since the coping saw blade was a little too wide.  I applied some epoxy to the frets before hammering them into place.


I snipped the frets flush, and then filed the edges smooth:


I made the nut out of some more oak, and the bridge out of oak and mahogany.


My original bridge design held all the tension of the strings.  After a few hours of being strung, I noticed the glue on one side pulling up from the soundboard.  I cut away most of the bridge, and drilled holes diagonally through the back of the instrument and the soundboard for the strings to feed through.


I did not have time to finish the wood at home, so I grabbed some tung oil out of a cabinet at MITERS, and finished it there.


With the strings back on.  I actually prefer how this string arrangement looks over the failed one.


June 3, 2013

Gourd Ukulele, Part 1

Being at home for a couple weeks before working on awesome robots for the rest of the summer means it's time for another woodworking project.  Probably because I heard my neighbor Nick playing his handmade stringed instruments all last year, I decided to make a stringed-thing for myself.  This should be interesting, as I have never made an instrument before, and also do not know how to play any stringed instruments.  But hey, summers are for learning all the things you didn't learn during the school year, right?

Something roughly ukulele sized seemed appropriate for a two-week timeframe.  The wood used for the neck was cannibalized from my desk at home, and the body of the instrument is made from a dried gourd.

I started out by pulling these two mahogany two-by-fours from underneath my desk, and gluing them together:


I sketched out the rough design of the neck on two sides of the wood:


Here's what the profile should look like with the body:


I shaped the neck with a drawknife.  To make it easier, I sawed down the center of the neck's arch. When making deep cuts, wood likes to split when the slope of your cut changes sign (a the bottom of the "U" shape) Making this cut let me remove material much faster without worrying about the wood splitting.  Here it is with one half of the curve roughed out:


Here's the drawknife.  The lighter colored board on the left had much straighter grain, and was a lot easier to shape.


The body is made from this dried gourd:


To prepare the gourd, I first lobotomized it; I sawed it open with a hacksaw and miter saw, and used a hooked knife to scrape out all the soft bits.


Brains... I mean seeds

The more precise sawing (craniectomy?) was done with a coping saw.


I hollowed out the head with a chisel and mallet, and cleaned up the slot with some smaller hand chisels:


Later, I'll bore four tapered holes through the sides of the head, for tuning pegs to fit into.


This is what the rough neck looks like:


I removed most of the extra wood at the gourd-end of the instrument, but some mahogany goes all the way through the gourd to support the string tension.  I cut the neck to match the curvature of the gourd, and epoxied the gourd in place.


Here's the instrument's profile.  The neck still needs a little work where it meets the gourd, but I really like how the shape turned out.


Since mahogany is not especially hard, I used something harder for the fret board.  I split this chunk of oak in my back yard:


After some thinning down, it looked like this:


To make it a bit more interesting, I lightly burned the surface with a torch.  The softer ridges in the grain blacken much more quickly than the harder ones, giving this nice zebra-like pattern:


The pattern really pops out when the wood is wet.  This should be more representative of what it will look like once I've applied some sort of finish to the wood.


I still need to find wood for the soundboard, make tuning pegs, attach and shape the fretboard, add frets, a bridge, sand and finish the wood, string the thing, and learn to play it.