February 10, 2013

Laminated Chainstays

During the blizzard-induced long weekend, I made a mold for the bike's chainstays and laminate it with carbon fiber.  I started out with a block of pink insulation foam:


I cut down the foam into a block for the spot where the chainstays connect to the bottom bracket, and two tapering rectangular rods for the chainstays themselves, and glued the three pieces together:


Lots of sanding ensued, and the end result was this:


I didn't think that the foam itself was sturdy enough to not get warped when vacuum bagging, so I laminated over it with a layer of fiberglass cloth using the electrical tape method.  The fiberglass also insulates the carbon fiber from the aluminum.


To do the vacuum bagging, I made a nozzle that connects the vacuum pump to the bag.  The barbed brass fitting threads into the circular aluminum plate through a small hole in the bag, and squeezes the bag between the washer and the aluminum plate to seal it.


The fitting worked reasonably well, but I was never able to get the bag sealed enough to retain a vacuum.  This would not be a problem if I could leave the vacuum pump running for ~10 hours at a time, but apparently the MITERS vacuum pump isn't designed for continuous use.

To laminate over the chainstays in carbon fiber, I chose to make my own unidirectional carbon fiber cloth out of the giant ebay roll of 12K tow I bought for my bamboo bike, rather than begging the FSAE/Solar EV teams to give me some of their cloth.


These sheets were folded over into four layer thick bundles, which cover the chainstays something like this:


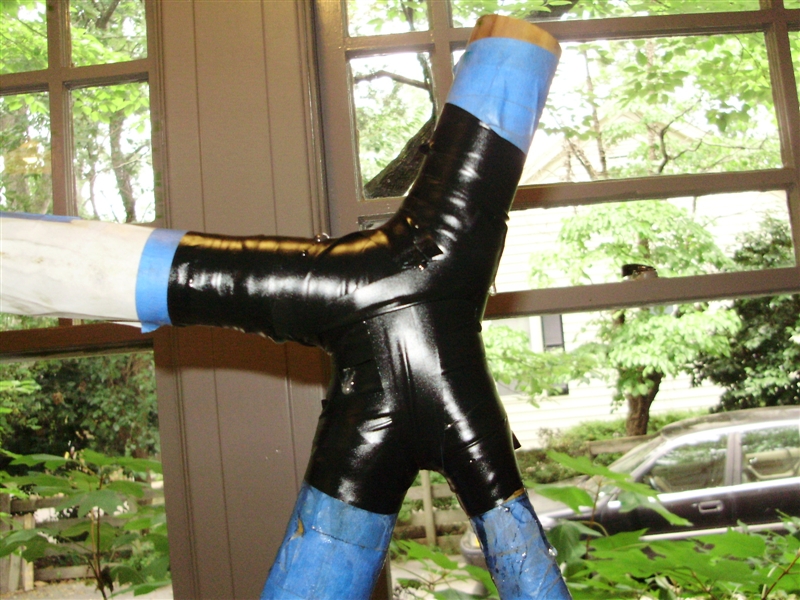
After soaking everything through with epoxy, they looked like this.  One leg has already been sanded:


The dropout area will be further reinforced:


 As will this bit.  I may neet to carve away some material and re-laminate it, as I'm not sure I left enough room for tire clearance.


Over all, it worked pretty well, although using tape to compress the joints made the surface wavy.  Lots more cleanup work will be required to get them as smooth as I want.  I have also found a few spots that are too thin, and will need some more reinforcement.  Once I finish cleaning up the surface and reinforcing everything, I will probably do a thin cosmetic layer of carbon to make it nice looking.

February 4, 2013

OarCycle: Tacked Front Triangle

I finished mitering the carbon fiber tubes, and tacked the frame's front triangle together.  Before doing so, I put a layer of fiberglass composite over the outside of the bottom bracket shell and head tube.  I attempted to vacuum bag the tubes, but I forgot about all the volume on the inside of the tubes when making the vacuum bags.  When I turned on the vacuum pump, all the bagging was sucked into the centers of the tubes, which caused the bagging to leak.  To avoid having to run the pump constantly to maintain the vacuum while the epoxy cured, I went back to the electrical tape method of compressing the composite.


To fill some gaps due to imperfect mitering and to fillet the intersections of the tubes, I made some epoxy filler by shredding carbon fiber tow.  The resulting mixture was smoothed over all the joints:


Because Carbon Fiber, the frame is much lighter than it looks, with the front triangle weighing in at 720 grams.  For the complete frame, I am aiming for something just above 1 kg, making  this frame under half the weight of my bamboo frame.


I made dropouts track fork ends to hold the rear wheel out of scrap 1/4" aluminum plate.  The two dropouts were roughed out independently, and then clamped together for final machining.  The non-right-angles were done by some creative clamping on the mill.


I touched up the dropouts on the belt sander, to round off some sharp corners and make them shiny:

Who needs a waterjet cutter....


Next up:  the rear triangle.  This bit is going to take much longer, because a) IAP is over, and b) I am out of pre-made carbon fiber tube.  I plan on making some sort of form for the seat stays and chain stays out of foam, and laying up the tubes from carbon fiber cloth myself.

February 2, 2013

Bike Frame Jig

Begin Build Everything Before IAP Ends mode:

I chopped up the oar with an angle grinder.  Sorry MITERS.  

Almost looks like a real bicycle

Rather than deconstructing an old aluminum frame for the head tube, bottom bracket shell, and dropouts, I will be making my own.  I learned how to make threads on the lathe, and made my own BB shell out of some aluminum tubing.  It is much thinner than one you would find on an all-aluminum bike, but since it will be wrapped in a few layers of fiber-reinforced-epoxy-composites it should be fine.  All the aluminum parts of the frame will be coated first in a layer of fiberglass composite before any carbon fiber, to prevent galvanic corrosion.


The BB shell is left hand threaded on the right side and right hand threaded on the left side.


Unlike my bamboo bicycle build, this time around I do not have a donor bicycle I can use as a jig. I built my own jig using some 80-20 extrusion, nylon rod, and aluminum plate I could scavenge.  I turned the nylon rod into 5 cones.  These cones will fit into the ends of the frame's tubes, holding them precisely centered.


Here is the finished jig for the front half of the frame.  It is fairly adjustable, so I could use it to build other frames later on, if I wanted to (provided they are the same size or smaller, and the head tube angle is roughly the same as the seat tube angle).  


I have the jig set up to mimic the geometry of the 56cm Trek Madone 7, their highest end road bike.  From the bike geometry information they provided, I was able to CAD the entire bike's geometry, and figure out the shape fo the jig from there.


The cones can be positioned at any point along the 80-20 extrusion:


With the jig done, I started mitering the carbon fiber tubes.  I did this on the mill with a hole saw.  Weird angles were made by rotating the mill head:


One down, two more to go.